Thursday, April 25, 2013

A Sneak Peek


This time last year our yard was an overgrown mess. I didn't even want to go out there let alone garden. Besides we were way too busy with the inside of the house to really think about venturing outside. It wasn't until the summer that I actually started working in the yard and we know how that turned out. I am hooked.

This is my very first spring in our garden and what a treat it is.  All of our trees and bushes are just starting to bloom. It's so exciting to see it all happening at once. In a week or so we are going to have a very beautiful garden, and I can finally show those before and after shots. For now I am going to give you what my plants are giving me - a sneak peak.


This calla lily was the first thing to pop it's head up this year. It's huge. I didn't plant this, it just appeared. It's one of the magical plants that appear in my garden that Aurora probably planted years ago. When they arrive I welcome them with open arms.


I got this hydrangea at the supermarket as an Easter present for Joey. The flowers had been died blue and I am sure it wasn't intended to last much longer than a few weeks. I hate to throw plants away so I found a little spot for it in the garden. At first I was certain it was going to die, but all of the sudden it took off. It's really quite beautiful and as you can see it's gone back to it's natural color.


This is my Petite Butterflies Sweet Pea shrub and the only thing that's petite about it is the flowers. I got four of these and they were cute little plants. Now they are huge, but they are really hardy and quite beautiful.


Sweet Breath of Heaven. Isn't that a wonderful name? The picture does not do this little bush justice. The green is very vibrant and the tiny flowers a perfect pink.


Jasmine. Pure magic. I have always wanted one of these and now I have two. One is in full bloom and it smells heavenly. I intend to let it take up an entire part of my yard and just sit out there and take in the fragrance.


Now it wouldn't be our garden without Aurora's rose bushes. When I first moved in one of the first things I thought was that the roses have to go. They can be ugly bushes and, let me tell you, they are a pain in the ass to tend to. However, after a year I have grown to love them. They are still a pain in the ass, but apart from the beautiful flowers there is a lot of sentiment that goes along with them. They are just starting to bloom and these are the first ones.


Not to be shown up by the bushes, our trees are also showing off. Our lemon tree is particularly interesting because it has tons of fruit but is also just starting to bloom. What a wonderful fragrance. 


I can't even begin to tell you how much I love our apple tree. It's been so bare and suddenly it's coming back to life. Soon it will provide us with the sweetest little green apples.


Finally, this is our little dogwood tree, but more importantly is our pigeon, Ellen, in the background. Ellen has been gardening with me almost since the beginning. She's always there and each time there is something new she comes to inspect it. So far she approves of our garden.

Friday, April 19, 2013

Lady Bug, Lady Bug


Last weekend as I was tending to my roses I noticed the dreaded aphid. There's a reason they are called "plant lice" and they deserve the ugly name. It's amazing to me that such a little bug can cause so much damage. They suck out the plants sap and thus the life out of your plants, leaving the weak and sickly. Seeing them on my roses was particularly disheartening as I have been pampering and reviving these bushes for over a year and they are thriving. There was no way I was going to let a nasty little bug take control. But what was I to do? Get rid of them, that's what.


There are many pesticides available for getting rid of aphids, but that is not an option for me. These particular roses are quite tall and growing through the top of our arbor. They are a favorite playground and hiding place for all the little sparrows that watch me like muchkins in the morning while I am feeding Ellen and watering the vegetables. There is no way I am going to put poison there. There are however a lot of organic solutions, the most prevalent being neem oil. I tried neem oil for powdery mildew last year and it really was not as effective as the milk bath I have been giving my roses weekly and I don't want to stop that. After searching across the web I found many articles suggesting ladybugs for the job.  There is even a site dedicated to ladybugs!

It seemed a little weird to order ladybugs online so I looked around to see if I could buy them locally. No luck. Believe it or not, everyone was sold out! Well, if that's the case then they must work. I went online and found Hirt's Garden sold them on Amazon. When I am ordering from a new vendor I prefer to go through Amazon so I know they are reputable. While I still felt weird about having bugs delivered to me via UPS, I decided to go for it. It also really seemed like my only alternative.

You can order ladybugs in different amounts starting at a small pack of 1,500 which is recommended for a small garden. They were only $12.99 plus $5.50 for shipping. I figured it was worth a try. What did I have to lose?

I place my order on a Saturday and by the following Wednesday I had a little box of ladybugs at my door. They were gently packaged in kind of hard mesh, sealed pouch.


There sure were a lot! While it looks kind of gross in the picture, they are ladybugs and still cute even in a mob of 1,500.  The ladybugs came packaged with care and release instructions and well as something called "Natures Nectar" which provides the hungry ladybugs some food after their long journey.

There are a few things you need to do before releasing your ladybugs. First is to provide them with water. I gently sprayed my rose bushes so they would have something to drink but not be drenched. The next step is to spray the plants in the area you are releasing them with Natures Nectar so they have some food and be more inclined to stick around. Last but not least, it's important that you release them at dusk so they don't fly away. Ladybugs don't like to fly around at night.


At dusk, I went out to my prepared rose bushes and went about releasing my new friends. I wanted to release them quite high on my bushes so they would be right at the root of the aphid problem and have some tasty morsels for breakfast.


I gently released them into my bush.  I thought they would come streaming out, but they really didn't. They were really docile.


The next morning I was very curious to see if my little friends had made themselves at home. I was a bit fearful they might have left for greener pastures.


I saw my first little guy on the post before I even got on the ladder to investigate. They are cute, aren't they?


As I got to the top of the ladder I saw more exploring the top of our arbor. At least some of them had stuck around. Then I looked up at my rose bush.


Wow, they were all over.  I was so pleased to see so many of them and they looks quite busy. I sprayed a little bit of nature's nectar on the rose bush and happily started my day.


I hope they stick around at least for awhile. I really like having them around. It all depends on the food source, though. My aphid problem was not out of control or even really bad so they might eat them all up and go on their merry way. I guess that's okay. I kind of feel like I have given them their freedom. If the aphids come back, and they most likely will, I can order some more and do it again. I might let the aphid population grow a bit so I can keep the lady bugs around longer and maybe, just maybe the home they fly away to will be mine.

Wednesday, April 17, 2013

Renewal


Shortly after Joey and I got our fences and deck done I dove right into setting up my raised gardens. Honestly, the stain hadn't dried on the redwood before I started planting seeds. For the last few weeks that really took up a lot of my time and I have not had time to weed or clean up the rest of my garden. It frankly is a big mess.  I've been dying to post before and after pictures, but in no way is it ready.

I have a huge task list of things to do and now that my vegetable garden is up and growing it's time to get to them. One of the first things on my list was painting our arbor. I used to think the weathered wood with the green tint was charming. Last year I grew morning glories and nasturtiums over it and it was beautiful.  However, now that the fences are done, it just looked shoddy. It was a huge eyesore right in the middle of our yard. Something had to be done.

I wasn't sure anything could be done about it, but figured I couldn't hurt it with a new paint job. This was going to be a challenge, though, since the rose bushes I have been lovingly tending for over a year grow right through the top. I would need to carefully clean and paint around them.

The first thing I did was clean the wood. Most folks power wash it, but like I said that was not an option for me. Instead I washed it by hand with a brush. This was no easy task and took me about six hours. Yep, I wrote that right - 6 hours! This includes the time spent hosing it off after washing. I have to say that the Behr All-In-One Wood cleaner I used really did the trick. I was so tired when I was done that I completely forget to take pictures!

The next day it was time for us to get the stain. We had three choices: Transparent, Semi-Tranparent, or Solid. We went with the Semi because while we wanted to cover the wood, we also wanted some of the natural grain to show through. This turned out to be a good choice.


The first coat took me about five hours to complete. There are lots of little slats, nooks and crannies in this arbor; and remember, I had to paint around those rose bushes. 

The next day I really had no interest in doing a second coat, but once I started I was really glad I did. It really made a difference. There were lots of spots I missed and in some cases entire sections! Also, having done it already the day before I had a better strategy in place. I actually enjoyed the second coat.  So how does it look? Well, see for yourself.

Here is a picture before:


Here's the after shot (ignore the messy yard, please!):


One more before:


And after:


I am really happy with it. The color really compliments the fence and the pigeon loft. the arbor honestly looks brand new.


So, now that this is done it's time for some major clean up. I have bushes to move and jasmine to plant and goodness knows what all. This certainly is a work in progress, but honestly, I am enjoying every minute.

Friday, April 12, 2013

Morning in the Garden


I love the mornings before I go to work. I get up early enough to have coffee and breakfast and spend time with our flock. It's a very peaceful time for me and ones of the few times I am alone. Well, except for the birds. Now I have added one new treat to my mornings - checking out my vegetable garden.


Every morning when I unzip the enclosure I am treated to new little sprouts and the one from before have gotten bigger. It's only been ten days, but almost my entire garden has sprouted.


My radishes, onions, carrots, zucchini, cucumber,lettuce, spinach, even my cauliflower, are growing up a storm. My eggplant hasn't done anything yet nor have my peppers. I read that peppers take about six weeks to germinate so I will be patient with them.


The beans are all growing, well, like a beanstalk. Before long I am going to be able to chase a giant for a golden egg. The one thing I was worried about was my Italian parsley. It was just this vacant square. I was beginning to think that maybe I had forgotten to plant seeds there but this morning there was a little, tiny sprout saying, "We're here!"


I am really digging this vegetable garden thing. I know it's early in the game but I think I might have a knack for this.

Tuesday, April 9, 2013

How Does My Garden Grow?


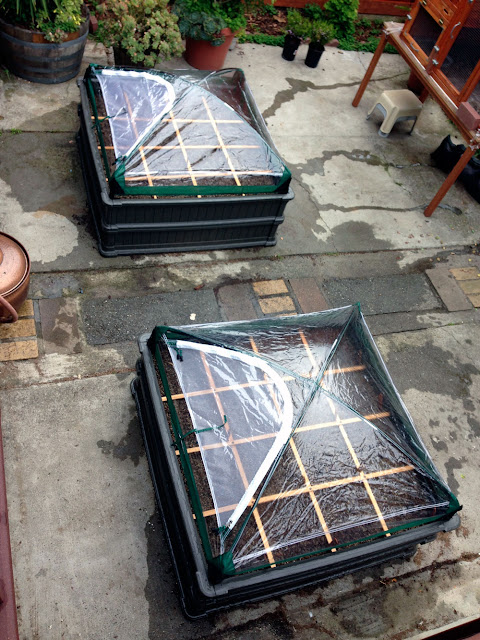
Once I had planted all my seeds I carefully put my enclosures on. I wasn't going to use them at first, but I figured they would offer protection and maybe my little garden would sprout more quickly. How quickly was a mystery to me. I really had no idea how long it took for plants to sprout. Imagine how thrilled I was when went down to feed Ellen three days later and saw this:


Okay, that's just Ellen waiting for me. I see that every morning, but she sure is cute, isn't she? I am so lucky to see her every morning.

This is what I also saw:


Yep, little tiny sprouts! These are my radishes! I was so excited I texted Joey right away with the news. He was pretty excited, too.  Both my radish and my daikon, which is a Japanese radish, have begun to grow in the neat little rows I place them in.  A few days later they looked like this:


Look at that! I have a vegetable garden. It's so exciting. Every day I go down more of my little vegetables have spouted! Almost my entire garden has sprouted except my eggplant, which apparently takes a bit longer. I can't wait to go down tomorrow and see what's next! Before I know it we will be eating our own produce! Won't that be something?!!!


Sunday, April 7, 2013

Sowing Seeds


Sowing seeds was one thing I was really excited about. I wanted to jump right it with that, but knew better. It does take a little planning. As I have written, I am following the Square Food Gardening technique, which will help me with planning. In this method you place a grid in your garden and divide it up into 1'x1' squares.


I got my grids at the Square Food Gardening Shop for $14.99 each.  I am sure you could make them rather cheaply but I wanted to see how they made theirs. I actually really like them. They fit in my garden perfectly and wood will be sturdier than string, but you could totally do it with string for probably about $5 total for both gardens. Hmmm, that's sure a money saver! Maybe I will do that when these wear out.  They should last for a long time, though.

The whole idea about square foot gardening is placing one crop into each square.  How many seeds you put in a square depends on the crop.  It ranges from just one plant for things like cauliflower to 16 plants for things like radishes. Things like lettuce are four plants, etc. I had 32 squares at my disposal so I went online to see if I could find something to help me organize this. Luckily I did at GrowVeg.com.


GrowVeg.com has this fantastic program for organizing your garden whether a traditional row garden or a square foot garden. It comes with a 30-day free trail which is ample time to plan your garden.  You can also join the site for only $25 per year. That's a great price.  The garden planner has all you need to plan your garden. You select your crop, drag it to your grid and it tells you exactly how many plants go in each square. That's just the beginning as the garden planner has many features that I haven't even tried yet. For this time, I just wanted to plan my garden and get planting remembering that this year is my experiment year. If I get too caught up in planning I am never going to plant.  It took me a couple of nights to get my garden organized the way I wanted it. Once I did that I was almost ready to plant. Just one more thing. I needed markers.


Having plant markers in my garden was Joey's idea and a good one at that. In everything I have read online, strangely that never came up!  With 32 squares I want to know what's planted where. To get my markers I went to eBay and got just the right ones.  These hard oak markers were $4.66 for a set of 12.  They are sturdy and really easy to write on. The seller got them right out to me in a flash and packaged them really well which is always appreciated.


Before I headed down to my garden I wrote out each plant name on a marker. I also wrote the corresponding square number on the top left corner of the packet and the number of plants per square in the top right. While this may seem super anal, it really saved time when I got to the garden. I knew exactly what was going where without having to flip through pages. I also have to say that this little exercise got me more familiar with what I was planting before I planted it. It was a very enjoyable part of the process.


Planting the seeds took me about 30 - 45 minutes. One planted I gave my garden a good watering. That's really important when you first plant your seeds. In fact I will be gardening it every day to keep the soil moist.  The great thing about square foot gardening soil is that you can't overwater apparently. That's good news for me!


My garden is planted! Now I just need to wait for my beans to sprout!


Thursday, April 4, 2013

Seed Money


Now that I have my gardens all set up and ready to go it's time to start planting seeds, right?  Well, not so fast. There is lots of preparation to be done before we reach that point.  First off I need seeds.

Knowing what to plant is a pretty tough choice. I honestly have never grown a vegetable in my life and have no idea what will grow here in Daly City. Most places have seasons, we have SEASON as in one.  The weather doesn't really change here. It's about 65°F all the time and it gets down to about 45° - 50°F at night.  In addition the Bay Area is full of micro climates, so half of Daly City is usually covered with fog, but it's pretty sunny near the mountain where I live. All of this makes deciding what to grow tough. What works at my friend's house in the city might not work for me here, despite being only ten minutes away. The only thing I know for sure is that tomatoes don't grow well.  So now I know what not to plant! I was looking at seed catalogs both at home and online and started to feel overwhelmed. There were just too many choices. I began to think maybe I would just garden next year.  Luckily the Universe stepped in and prodded me along.


A couple weekends ago Joey and I went to the San Francisco Flower and Garden show for my birthday.  Among all the beautiful plants and exhibits we came across The Living Seed Company booth. It was a godsend.  Not only are they local so they know what works in my area, they sell only open-pollenated, non-gentically engineered seeds.  I wasn't hunting for this in particular, but it is something I am starting to become more aware of.  The man there was really helpful and we went away with a large collection of seeds as you can see below.


Joey and I decided that since square foot gardening is all about planting a different crop in each square, we would do just that. We are going to plant a lot of different vegetables this year and see what works and what doesn't. This year is going to be our little experiment.  Gardening should be like that - an experiment. At least that's what I think. We also decided that one planter was going to be dedicated to seeds exclusively from The Living Seed Company and the other garden was going to be from seeds we got elsewhere.  That elsewhere turned out to be Target.


I know what you are thinking, from one extreme to the other.  Here were are worrying about "open-polinated heirloom seeds" and now we are buying seeds along with dish soap and toilet paper. Well, I think that makes this little experiment all that more interesting. As a first time gardener I am curious to see what works and what doesn't including the seed source. Target carries Burpee seeds. I really haven't heard anything bad about them so I figured this was as good as anywhere else. As you can see, once again we bought a lot of different seeds, but we weren't done yet.  Now we are off to Amazon to finish up!


Target didn't have any cauliflower and were out of eggplant. I am fully aware that neither are supposed to grow very well in Daly City, especially the cauliflower, but I want to try it anyway. Perhaps I have magical growing powers. You never know.  Rounding things out were daikon. They just sound fun to grow.

So, I've got my seeds and now I can plant them. I wish! Now I have to decide where to put everything. For that I need a planner. I think I know just where to find one.